
Lounging self-adhesive vinyl tiles is simple and anyone can get it done. Ensuring the finish result looks professional as well as, which the tiles will not begin to peel up in the sub-floor following a couple of days useful, requires a little more effort. Finding out how to lay self-adhesive vinyl tiles is about persistence and a focus to detail. No specialist tools needed!
To begin with, you will have to make certain the sub-floor in which the tiles are now being installed is neat and absolutely even. Any small bump or shallow hole will transfer towards the vinyl, after a couple of days your brand-new vinyl floors will appear as old because the one it had been replacing. Use self-leveling compounds to make sure a level surface, so if you’re lounging self-adhesive vinyl over old vinyl or wood make certain they’re in top condition. Sometimes is simply simpler to get rid of that old vinyl floors and install over its sub-floor, especially if it is extremely broken.
Vacuum neat and mop the area, and make certain to clean away any remain of adhesive, dirt or grease that will obstruct from the glue on the rear of self-adhesive vinyl tiles sticking with the ground. Leave the sub-floor to dry, as vinyl tile installation needs a perfectly dry surface for that adhesive to operate.
To determine best places to begin to lay self-adhesive tiles you’ll first must find the center from the room. You should use individuals chalk lines to help you in lounging the very first row of self-adhesive vinyl tiles so that they are straight and you will find no uneven edges. You might want to lay the tiles without peeling the rear paper at this time, just to obtain a concept of the ultimate effect.
Vinyl tile is a straightforward and cost-effective DIY project that may help you enjoying your brand-new vinyl floors in under 48h. Self-adhesive vinyl tiles make a fantastic choice for flooring in your kitchen, bathroom or any room, mimicking the feel of ceramic and stone tiles but in a reduced cost. Applying self-adhesive vinyl tile is simple, and needs no specialist understanding besides a little bit of knowledge of other DIY projects.
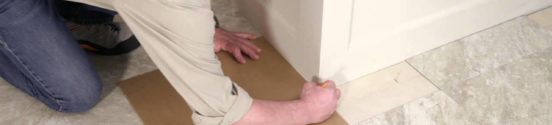
To put self-adhesive vinyl tiles you will have to start make up the center point, peel the rear paper and press the tile firmly towards the floor. Make use of a moving pin to make sure there aren’t any air bubbles, utilizing an even pressure within the entire tile, specially the edges. Align each new tile using the formerly installed one, ensuring the perimeters are as near to one another as you possibly can. If you want to cut a tile to slot in the area near the wall, you can make use of an utility knife to do this but make certain you do not cut them on the top of already installed tiles, or else you damages them accidentally.